How to Explain the Cause of the Welding Defects on the Negative Plate
1. Common welding defects can be classified into four categories:
1) Weld size does not meet the requirements: such as ultra-high, ultra-wide, too narrow, too large difference between height and height, weld transition to the base metal is not smooth.
2) Welding surface defects: such as undercut, Weld, concave, overflowing, no penetration, surface porosity, surface cracks, etc. .
3) Weld internal defects: such as porosity, slag inclusion, cracks, non-fusion, tungsten inclusion, double-sided welding, such as the lack of penetration。
4) The properties of welded joint do not meet the requirements: the mechanical properties and corrosion resistance of welded joint are reduced because of over-heating and over-burning.
2. The damage of welding defects to welded components mainly includes the following a

spects:
1) Cause stress concentration
The distribution of stress in welded joint is very complex. Where there is a sudden change in the cross-section of the structure, the distribution of stress is particularly uneven, and at some points the value of stress may be many times larger than the average value of stress, this phenomenon is called stress concentration.
There are many reasons for stress concentration, and the process defects in the weld is one of the important factors.
The cracks, incomplete penetration and other defects with sharp notch in the weld make the section of the weld discontinuous, resulting in sudden change of position, which will produce great stress concentration under the action of external force.
When the stress exceeds the fracture strength of the metal material at the front end of the defect, the material will crack.
2) Shorten service life
If the size of the defects in the weld exceeds a certain limit, after a certain cycle, the defects will continue to expand and grow until fracture occurs.
3) Cause brittle crack, endanger safety
Brittle fracture is a kind of low stress fracture, which is a rapid and sudden fracture without plastic deformation.
The welding quality has a great influence on the brittle fracture of the product.
3. Welding defects
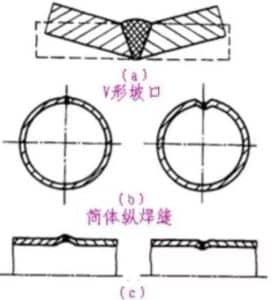
1) Welding deformation
Generally, the workpiece will produce deformation after welding, if the deformation exceeds the allowable value, it will affect the use.
The main reason for this is the uneven local heating and cooling of the weldments. Because when welding, the weldment is heated to the high temperature only in the local area, the closer from the weld, the higher the temperature, the greater the expansion.
However, the metal in the heating zone can not expand freely because it is blocked by the lower temperature metal around it, while it can not shrink freely when it cools because it is restrained by the surrounding.
As a result, there is tensile stress in this part of the heated metal, while there is compressive stress in equilibrium with other parts of the metal.
When these stresses exceed the yield limit of the metal, welding deformations will occur; when the strength limit of the metal is exceeded, cracks will occur.
2) External defects in welds
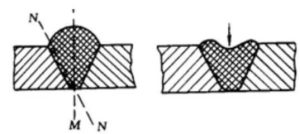
(1) Too much weld reinforcement
This phenomenon occurs when the welding groove angle is too small or the welding current is too small.
The dangerous plane of Welds has transited from M-M plane to N-N plane of fusion zone. Because of stress concentration, it is easy to be destroyed.
(2) The Weld is too concave
As shown, the strength of the joint decreases due to the reduction of the working section of the weld.

(3) Weld undercut
The indentation formed along the edge of the weld on the workpiece is called undercut, as shown in the figure.
It not only reduces the working section of the joint, but also causes severe stress concentration at the undercut.
(4) Welding tumor
The molten metal flows to the work piece which is not melted at the edge of the Bath and accumulates to form a weld nodule, which does not fuse with the work piece, as shown in the figure.
The weld bead has no effect on static load strength, but it can cause stress concentration and reduce dynamic load strength.
(5) Burn through
As shown, burn through refers to the part of molten metal from the weld back leakage, or even burn through the hole, it makes the strength of the joint decline. The above five kinds of defects exist in the weld appearance, the naked eye can be found, and timely repair welding. If the operation is skilled, it can be avoided.

3) Internal defects in welds
(1) Non-penetration
Incomplete penetration is a kind of defect of partial non-fusion between workpiece and weld metal or weld seam. The incomplete penetration weakens the working section of the weld, causes severe stress concentration and greatly reduces the strength of the joint.
(2) Slag inclusion
There is non-metallic slag in the weld, that is, slag inclusion. The slag inclusion reduces the working cross section of the weld and causes stress concentration, which reduces the strength and impact toughness of the weld.
(3) Porosity
The weld metal absorbs too much gas (such as H2) or gas (such as CO) from the metallurgical reaction in the molten pool at high temperature, which can not be discharged in time when the molten pool cools and solidifies, the porosity.
The existence of porosity reduces the effective working cross section of the weld and reduces the mechanical strength of the joint. If there is a penetrating or continuous gas hole, will seriously affect the sealing of the welding.
(4) Crack
During or after welding, the local cracking of the metal in the welded joint area is called crack. Cracks may occur in the weld or in the heat-affected zone (haz) on both sides of the weld. Sometimes produced on the metal surface, sometimes produced in the metal.
According to the mechanism of crack, it can be divided into hot crack and cold crack.
4.1 Hot Crack
Hot cracks are produced in the process of crystallization from liquid state to solid state in weld metal, and most of them occur in weld metal. The main reason is that the low melting point material (FeS, melting point 1193 ° C) exists in the weld seam, which weakens the relationship between grains. When there are many impurities such as s and Cu in welding parts and electrodes, they are easy to produce hot cracks. Hot cracks are distributed along grain boundaries. When the crack penetrates the surface and communicates with the outside, it has obvious hydrogenation tendency.
4.2 Cold Crack
Cold cracks are produced during the cooling process after welding, and most of them occur on the fusion line between the base metal or the base metal and the weld. The main reason is the formation of quenched structure in HAZ or weld, which causes the fracture of grain under high stress. When welding easy quenched steel with higher carbon content or more alloy elements, cold cracks are more likely to occur. Too much hydrogen in the weld can also cause cold cracks. Crack is a very dangerous defect, it can not only reduce the load-bearing section, but also produce serious stress concentration. Therefore, it is not generally allowed to exist in the welding structure such defects, once found to shovel to re-welding.
Learn more our project quality managemet, QAQC and third party inspection (TPI), NDT practices thru below link.-
https://www.jsc-safe.com/quality-management-quality-assurance/
